Using the GUI Tool to make RGB Lamp shows
Preparing to use the GUI Tool (for RGB LampShows, etc)
To start, you need an image of the playfield and the resolution matters because that’s how big the window will be when you use the tool later. At the time of writing resizing the window isn’t supported, which is lame, I know. The playfield image is better if it’s easy to somewhat ignore. I like to wash these images out (make them grayscale) so I can clearly see switches and lamps on top of the PF image. It is also crucial that the image is as “normal” (not distorted and directly overhead) as possible. A scan would be best, but then you lack ramp placement.
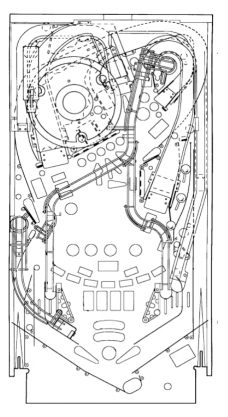
Below are three example images that work well:
The first is just lines, taken from JD’s manual page. Very clear, very easy to see, but a bit hard to relate to the artwork.
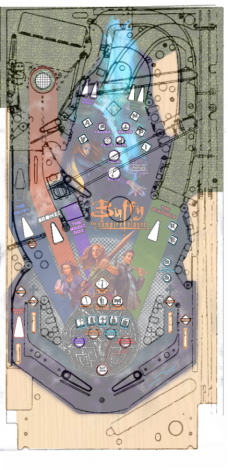
The next example is of the Buffy playfield; line drawing super imposed on a washed out version of the playfield art, making it a bit easier to orient the user of the tool:
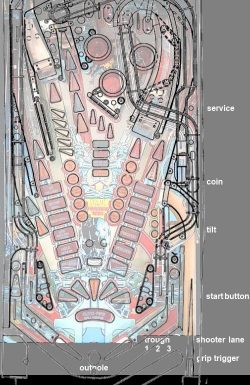
Last is an example of washed out playfield art under line drawings, complete with extra space on the right hand side with text based labels as placeholders for placing the coin door switches within the tool.
The command line example below supposes the filename is playfield.png.
Run the tool
You run the OSC tool using an command line arguments so it can find your machine yaml (t2.yaml in this case) and the playfield image (playfield.png) as such: python switchMatrixClient.py -y t2.yaml -i playfield.png
Once you’ve run the program this way once, in the GUI’s menus, save a layout file, so you can keep your layout file (which includes lamp and switch placement).
Laying out switches and lamps:
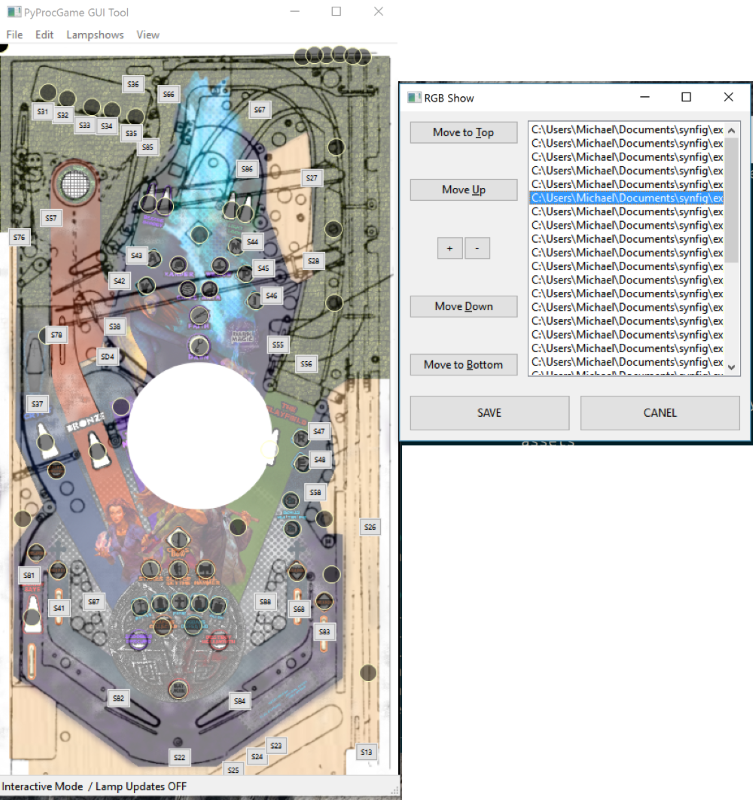
In the GUI menus select “Layout Mode” which pops up two windows. One contains a button for each switch the other a button for each lamp. To place a lamp (or switch), left-click the lamp button, then click the playfield to place the lamp. The button stays an alternate color so you know which ones you’ve already placed.

(Notice in the screenshot above, the playfield image has not been washed out and as a result the interface is very hard to read).
For any switch or lamp you don’t want to place (and don’t want to see), the GUI provides an option to hide specific switches/lamps in the menus.
You’ll want to align your lamps as accurately to the inserts (or GI) locations as possible. When you make an RGB show, the position of the lamps (as you’ve placed them) will be used to determine the colors. Proper alignment will be key.
Creating an RGB light show
RGB Lamp show animation works by importing a bunch of images into the tool. Each image represents one time step in the RGB show. The tool then overlays each image over the playfield, and detects the pixel color that overlaps each lamp. Ideally, the images are the same size as the playfield image, so it’s easy to color the lamps.
The RGB lamp show tool is in the menu under Lampshows->Create an RGB Show (experimental) and the resulting pop-up is a prompt to open a sequence of images. Once you’ve opened the sequence you can rearrange the individual frames, add/remove frames, and save the sequence.
See the examples below to understand the contents of a generated file.
Recommended “manual” workflow:
Take a screenshot of the tool, with the lamp locations visible. Save the screenshot as an image, and use it as a base-layer in a paint program. Create more layers and “paint on top of” the playfield image. Save the layers as individual images. Each layer/image/frame is one moment in time/step in the animation.
Better workflow:
Even better is to use an animation tool. I use synfig which is a good, free 2D animation suite. Take your playfield screenshot as the background and animate different colored shapes moving over the playfield. Export the individual frames of the animation (as pngs). Bring the frames into the RGB maker so you can generate an RgbShow.
Usage/Playback:
The RgbShow file format is supported as a valid lampshow format in attract.yaml, provided they are defined in the asset_list.yaml under an RGBShows: section, similar to the LampShows section, as so:
RGBShows:
- key: 'attractRGB'
file: 'test.rgbshow'
They can be manually played by the rgbshow_player object that exists in the game. For example:
self.game.rgbshow_player.play_show('attractRGB', repeat=True, save_state=True)
And technically they can be loaded by that object as well (e.g., if you prefer not to use the asset manager) as such:
self.game.rgbshow_player.load("attractRGB", "%s/assets/lampshows/test.rgbshow" % self.game.curr_file_path)
What’s in a .RGBShow file?
The RgbShow file format contain a dictionary at the top that defines mappings of human readable ASCII characters to specific hexadecimal color values (as hex: rrggbb). The body of the lampshow contains the names of the lamps and a sequence of colors – each column entry is that lamp’s color per time unit (the color is the defined in the dictionary above).
An example is provided below to show how the files are internally structured. Notice that lines that start with # are comments. Lines that start with ! come in two forms: the first are directives and can be overridden when played via play_show(), the second are the mappings of characters to colors. Note that the specific mapping syntax used => vs. ~> adjusts the color cycling behavior as indicated in the comments of the example. The mappings map from a single ASCII character to the specific 24bit color for the lamp in hex.
The body of the show ignores leading whitespace and defines what a named lamp/led should be doing over the course of the show playback.
##############################
# Generated RgbShow file
! repeat = False
! hold = False
! time = 30
# time is the duration of a step in ms
##############################
# => defines a color to change immediately (on first occurance)
# ~> defines a fade into color --fade will be completed on the LAST occurance
##############################
# COLOR MAP:
##############################
! B => ff0000
! C => ffc020
! A => 000000
###########################################
giLowerRight | AAABBBBBB
weapScythe | AAAAABBBB
playfield3X | AAAABBBBB
Mayor | AAAAABBBB
Elight | AAAAAAAAB
Angelus | AAAAAABBB
battleHellmouth | AAABBBBBB
playfield2X | AAAAABBBB
weapCrossbow | AAAAAABBB
weapHammer | AAAABBBBB
weaponsCompleted | AAAAAABBB
Master | AAAAAAABB
outlaneRight | AABBBBBBB
rightRamp | AAAAAAAAB
weapStake | AAAAAAABB
inlaneRight | ABBBBBBBB
giSlingRight1 | CCBBBBBBB
giSlingRight2 | CCBBBBBBB
DarkWillow | AAABBBBBB
scoobyCompleted | AAAAAAAAB
bigbadsCompleted | AAAABBBBB
slayAgain | AAAAAAABB
Glory | AAAABBBBB
giMidRight3 | AAAAABBBB
###########################################
- Caveats as of 2/5/2018 on the dev branch*
Gradients are okay but if you use more than 64 unique colors, this version of the tool gets unhappy –I may patch you a full color version in the future, but the RgbShow output is pretty gross/unreadable if we store full color entries for each step in the show.
